Archive

Archive for the ‘Aspen installation’ Category

First flight (part 3)

March 21, 2010 Leave a comment

After getting clearance into the Sunport for an ILS Runway 8 approach we configured the system to have NAV 1 tuned to the ILS displayed on the PFD’s HSI. We set up the MFD1000 to display the HSI on the bottom half of the display with Nav 2 tuned to the ABQ VOR. The MFD continued to show the full map with the ILS 08 procedure entered into the GPS and displayed on the MFD500. I recognized I had incredible situational awareness. The Avidyne traffic provided me good indications of traffic.

On the way to Sunport, Albuquerque approach indicated traffic at 11 o’clock and converging. Almost immediately after the call the Avidyne system identified it as a traffic alert. The traffic alert came up on the system and we were able to make a change in our direction to resolve the alert. On my first flight with the system I was able to experience the incredible situational awareness with the integrated Avidyne TAS with the Aspen system. It was truly impressive.

We headed for the Albuquerque Sunport ILS approach. We lined up on final, intercepted the LOC, then GS. The representation on the PFD and MFD displays was excellent. We flew down the approach and executed a missed approach and headed to my home airport of Double Eagle. Approaching Double Eagle I was able to navigate the Class C airspace at Albuquerque and identify the class D airspace at Double Eagle. Part of the Double Eagle airspace entering from the east underlies the class C airspace at Albuquerque. This representation on the MFD along with associated airport space was very helpful. Knowing that Aspen is working on enhanced panning and information display for airspace made me impatient for the next release in April. I landed at Double Eagle on Runway 22’s brand new surface. As I taxied off the runway I was pretty happy with my landing especially with Tom on board.

After returning from the airport, Tom and I went through the squawks. The most important being the cross check attitude. We called Pat at Santa Fe Aero and we both came to the conclusion that there was some sort of magnetic interference on the PFD’s RSM. Given that there was nothing close to the RSM in the fuselage we began to suspect the mounting screws. Due to the large shim on my airplane Santa Fe Aero was unable to use the brass screws provide with the installation kit. Santa Fe Aero used stainless screws. While this is permitted under the installation manual we decided to change the screws to brass.

Other non-Aspen related squawks included too high RPM at idle and the flap switch would not allow the flaps to be put in the take-off position without going to full flaps then back to Take Off. We decided that Pat and his team would come down to Double Eagle to reset the throttle quadrant to allow idle, change the flap switch and do a checkout flight with Pat to look at the cross check message. Next up, cleaning up the squawks.

Categories: Aspen installation, Flying

First flight (part 2)

March 21, 2010 Leave a comment

Before I knew it we were out in the airplane doing the pre-flight. In addition to the Aspen installation I had Santa Fe Aero make some changes to the throttle quadrant and cable as well as eliminating a noise associated with aileron movement, so I was very careful about the pre-flight checking all flight control and throttle/prop and mixture movements with even more attention than the normal thorough check I make before every flight. After completing the pre-flight the big moment came. I powered up the airplane and the Aspen system. Immediately the display came alive and we were checking all of the necessary systems.

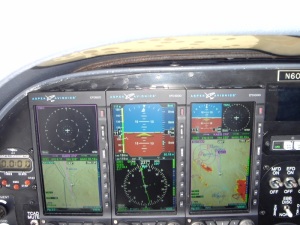
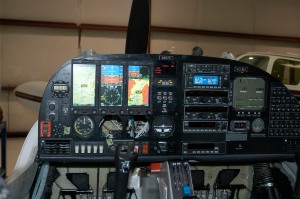
I had spent some time thinking about how I was going to use the three display system.  I configured the system with the normal PFD with weather and traffic activated under the HSI. I set the MFD 1000 in a three tile configuration having the attitude/altitude/airspeed in the upper left hand corner, traffic in the right hand corner and nav map in the lower half of the display with terrain turned on. Santa Fe has a lot of mountains and terrain around the airport and the display of this was more than comforting. On the MFD 500 I configured it for an entire display of the nav map with weather turned on. While there wasn’t any weather in the immediate area there was weather around the surrounding mountains that were clearly identified on the display. I also had traffic overlay on the nav map turned on.

After finishing the checkout and getting clearance from the Santa Fe tower we taxied out to the run up area. Everything looked very good and after run-up positioned for takeoff. A quick check of the instruments and we were off. Just prior to pushing power forward for take-off I glanced at the display to see the aircraft in the pattern clearly displayed on my MFD’s. I thought for a moment that this was incredibly cool! As a low time pilot one of my biggest anxiety as a pilot is identifying and keeping an eye on traffic. I realized that while the Avidyne TAS does not eliminate the need for see and avoid processes it was going to be a big help in finding that traffic quicker when I am flying.

We were quickly off the ground. The temperature was around 37 degrees F and the airplane jumped off of the ground. The tower cleared us for the practice area and with the help of the nav map topography and KLN94 GPS it was easy to find and navigate within the practice area while staying out of the class D Santa Fe airspace. Since I was flying with Aspen’s chief pilot Tom Gray in the right seat, I was not only excited about the Aspen System I also wanted to make sure my flying was precise. Unfortunately I found myself having trouble holding speed and altitude through steep turns and even level flight. I had never really flown with tapes before and I was trying to “chase” both, never really getting stable in either.

Tom reassured me that after a short period of time this would become second nature. After 20 minutes in fact I found myself settling down and not doing too bad. We put the MFD 1000 into Reversion mode to compare the attitude and air data parameters. This display is really incredible. I basically have full dual redundancy with the exact display of the PFD. This is truly comforting when considering failure conditions and ability to safely transition to a back up mode without having to change my scan. During steep turns we noticed that we had a bit of lag between the MFD and PFD. Turning either way showed different characteristics. We hypothesized that this might be related to one RSM being way out on the long wings of the DA40 and the other on the fuselage. Then shortly thereafter we got a crosscheck attitude display on the PFD. We took note of the conditions and continued on. After completion of the turns we headed to Albuquerque Sunport to fly an ILS approach. We configured the system to provide a half traffic and half nav map on the MFD500 so we would have a larger look at traffic coming into the busy class C airspace.

Displays during first flight

Categories: Aspen installation, Flying

First flight (part 1)

March 15, 2010 2 comments

As the days passed my good friends at Santa Fe Aero finished up the installation and our first flight checkout quickly approached. Over the previous two or three days, I had been planning my checkout flights. Due to the nature of magnetometer technology I planned several steep turns in both directions, descents and climbs in turns and level to determine the performance. My installation has a Remote Sensor Module (RSM) on the fuselage just behind the passenger compartment and the other well out on the wing. I wondered whether this would cause some difference in the heading in steep turns. I also made preparations for activating my XM weather subscription.

The day before my trip up to Santa Fe Aero I made the call to XM to activate my weather subscription. They had to shuffle me between people to get the right information set up but we finally got it and Santa Fe Aero had what they needed to activate the XM weather. On a Thursday as scheduled Pat Horgan of Santa Fe Aero called me and said they were ready to go. Unfortunately our unusually wet winter in New Mexico did not cooperate and I had to wait until the following Wednesday for the weather to clear. I know this will sound corny but the anticipation was unbearable. I had just become an aircraft owner and I had already become attached to my airplane!

Wednesday morning came and our chief pilot Tom Gray and I took the New Mexico Railrunner train from Albuquerque to Santa Fe. On our trip up to Santa Fe there was still snow on the ground from the previous week’s storms. Pat picked us up at the station in Santa Fe and we quickly arrived at Santa Fe Aero’s facility at the airport. After a quick and very good New Mexico lunch complete with the necessary green chile sauce we headed back to the airport. Tom did a quick ground check of the system and I worked out the final agreement on the charges and payment.

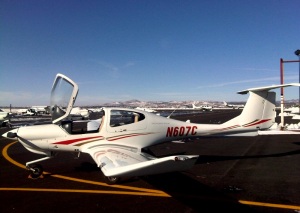
My Airplane - ready to fly!

Categories: Aspen installation

Power up!

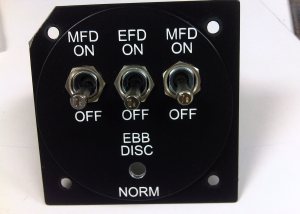
Power up day arrived. I took the short 45 minute car ride up to Santa Fe early in the morning. It had snowed quite a bit during the night so the drive required a bit more concentration than usual. I couldn’t hide the fact that I was pretty excited. I arrived at Santa Fe Aero and was brought into the hangar immediately. The Santa Fe crew updated me on the progress of the installation. We discussed the different things that had been done and I got my first real good look at the extension that they had manufactured on my panel. They had done a real good job. You could barely notice the extension and it made the whole fit and finish of the panel look very clean. They quickly got to it and connected ground power to the airplane. They had manufactured a very nice circuit breaker switch panel for the on/off switches for the PFD and MFD and installed it into an unused instrument hole. This will make it really nice during power up as it is right in front of me and will make it easy for my checklists to power them up and down.

PFD/MFD switches to be placed in existing panel opening

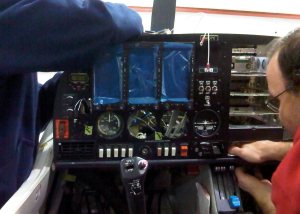
Final wiring (note PFD/MFD switch panel)

Power came up and the PFD and two MFDs came right up.  Since we were in the hangar we could not get GPS or traffic info on the displays but the crispness and color of the displays was beautiful. I couldn’t wait to use it in flight.  We worked through all of the different modes and everything worked as advertised.  After some more discussion I found out I was a week away from getting the first flight in–weather permitting. They needed to finish up the RSM installation and wiring for the TAS, close the airplane up and do the compass swing.

They pointed out that the throttle quadrant was not going to the engine stop due to a setting change that needed to be adjusted to ensure I get full power from the engine. They also needed to perform a couple of other things on the airplane including throttle cable replacement and pitot static line guards recommended by Diamond.  I have to admit that although I was very excited I was also seeing the bill rise.  There always seemed to be something else that needed to be done, all very legitimate and necessary but difficult to absorb.  The Santa Fe Aero guys were very thorough, something that I am very pleased about.  As everyone kept telling me; welcome to airplane ownership.  Didn’t make it any easier though!  Next up; final checkout and first flight!

System power up

Categories: Aspen installation

Slight problem…but a happy ending

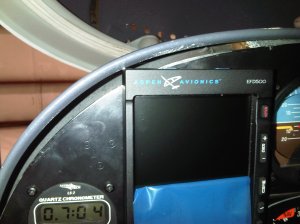
The next day I checked my email and sure enough there was an email from Pat. After doing a fit check the guys up at Santa Fe Aero discovered an issue–The curvature of the panel for the DA40 is too sharp leaving the upper left hand corner of the MFD500 protruding beyond the panel. When we discussed the installation in the beginning I was quite excited being able to take advantage of the EFD1000 installation sliding directly into the existing hole of the six pack and importantly being able to save considerable money.  Now I was beginning to worry that I may have to pay for a new panel!

Fit check - MFD protruding over edge of existing panel

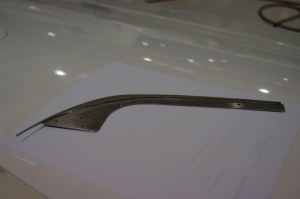
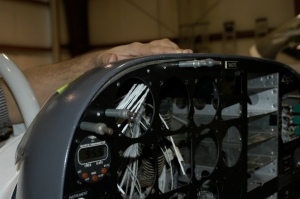
Pat again calmed me down (Pat’s calming voice and approach to working with me is something that will be a recurring theme in my experience!) as he had a solution already. With the broad machining capabilities at Santa Fe Aero Services, they had already come up with a machined piece of metal that could be flush mounted to the existing panel. This extension will allow me to not only retain my panel but save me thousands of dollars. I decided to drive up to Santa Fe and take a look for myself. The piece was incredibly well done and the flush mounting of it will not only be a great solution it will be almost impossible to tell it is there.

Machined panel extension

Machined panel extension held in place - perfect fit!

Disaster averted!  After calming down I was able to enjoy the fit check and to discuss the placement of the ACU and other parts of the system. Since I retained my KLN94 and Bendix King radios my installation required 2 ACU units.  I was able to see where the units would be installed under the back seats.  We also discussed and identified the placement of the Emergency back up battery, weather receiver, TAS610 placement power switches for the Aspen system and general update on the installation. I left Santa Fe Aero that day with a renewed sense of confidence that maybe this whole thing will work out just great.  Next up: Power up…

Categories: Aspen installation